Users
See also:
- Work schedule agents and Auto-pause
- How to add users to current queues
- Caller ID sending when forwarding call to mobile
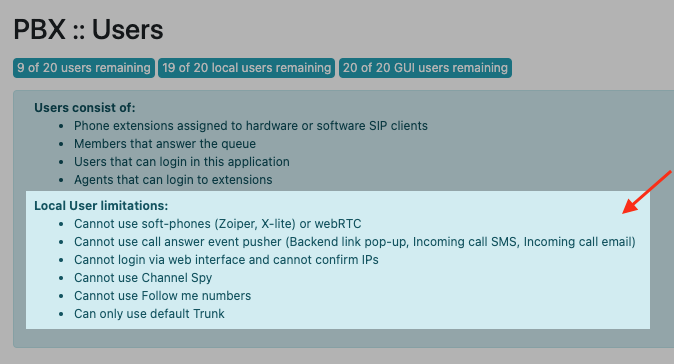
Users definition:
- The extensions linked to phones (software or hardware)
- Members answering queue calls
- Users that log in PBX server
- Agents that log to extensions
In order to add users:
1. Go to the main menu PBX/Users
2. Click on New User up right
3. Select the type of user that you want to add: Standard/Local/Mobile/GUI

4. Fill in the form based on necessities
In PBX/Users/Create new User page a form will pop up in a standard format.
Depending on settings complexities, the form can be set as advanced.
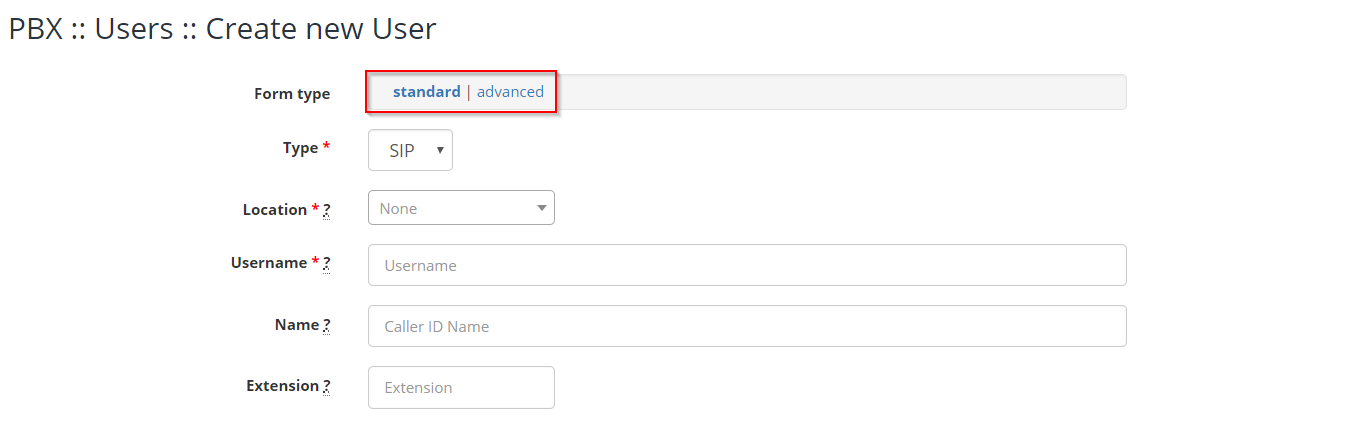
Available settings
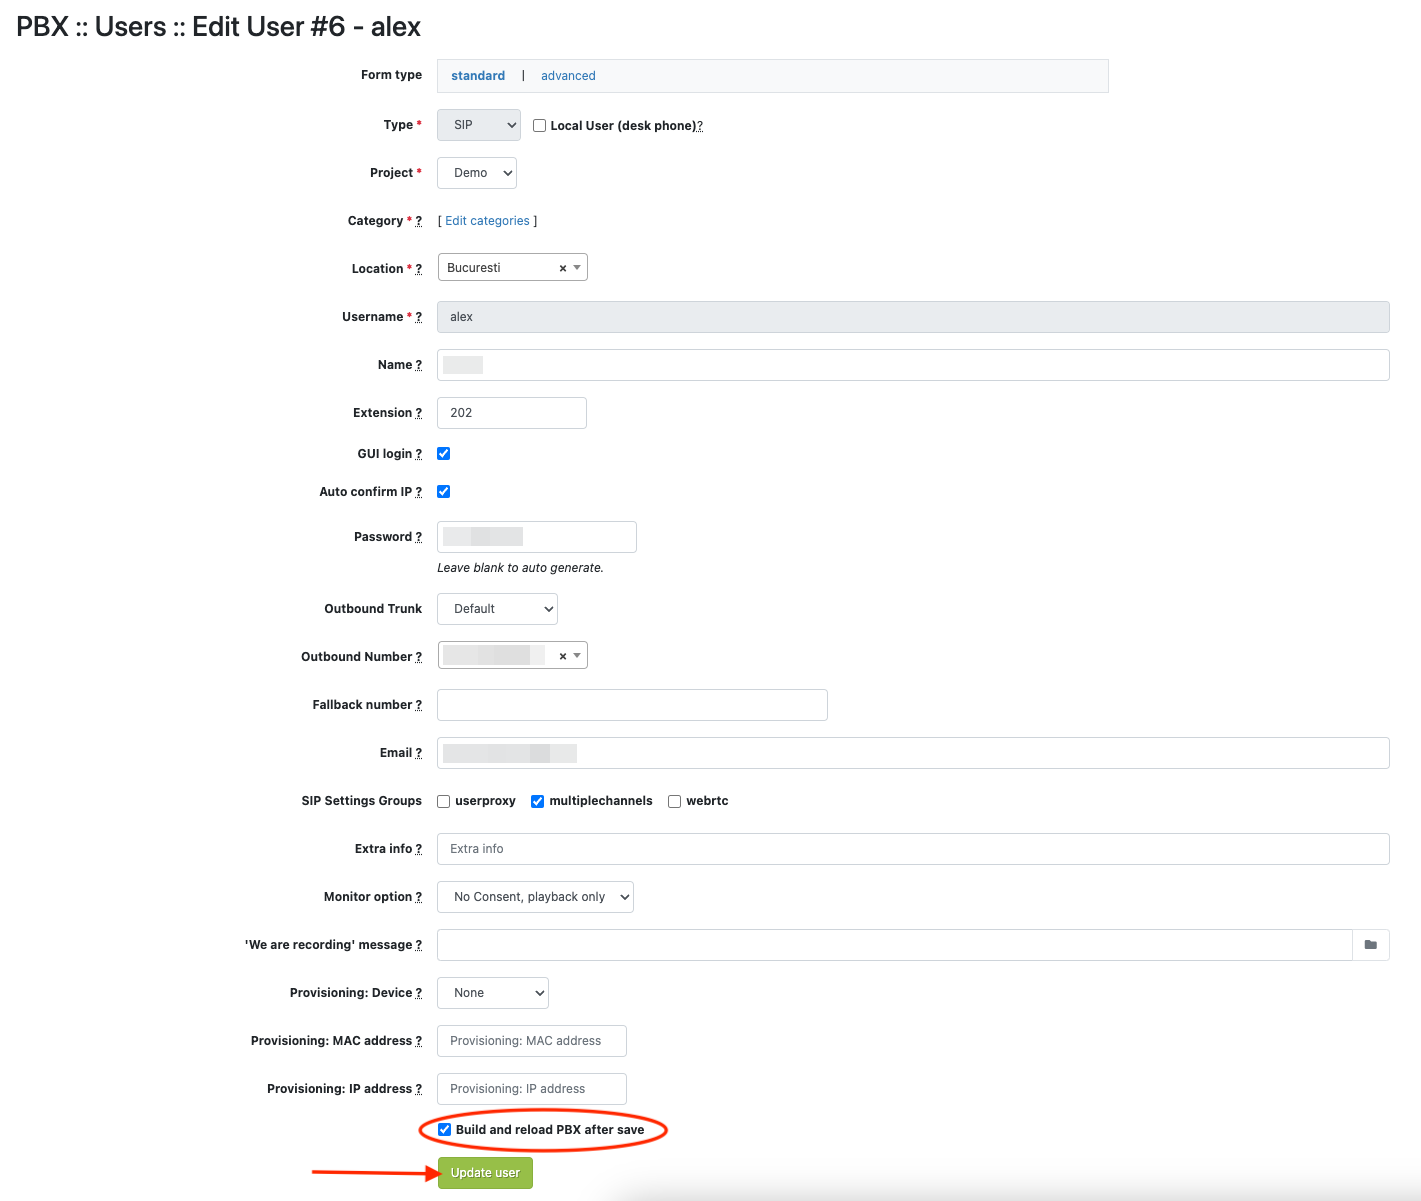
- Type: The default value is SIP
- Location: Used for prefixing emergency numbers or other legal requirements; select the appropriate city, if applicable or leave blank
- Username: Fill in the information as in last name-first name, lowercase;
For each user a password will be generated that will pop up afterwards ( after creating the user) in field Password
- Name: Fill in data as in First name Last Nume
- Extension: Insert the extension to which the user can dial; this needs to be unique per user. Leave blank to be generated automatically.
- Password: The password will be automatically generated
- Project: Optional, select the project linked to the user
- GUI Login : Check; to allow the user to log in PBX as an operator, with the above mentioned data
- Outbound number: Fill in with a phone number from the set of phone numbers provided by the operator, in order to be utilized as an external identity (E.g..: 0210000000/123/anonymous)
- Fallback Number: The mobile number of the user or the extension of another user, utilized in queue, along with the option SIP + Fallback; the option is used to redirect the call to the defined number / extension, if it is not answered within the time interval defined by the CALL_TIMEOUT variable (60 seconds default or according to the settings)
- Call Group: Specify which number of pick-up groups this user belongs to, completing with a value ranging between 0 and 63.
The field allows you to fill in numeric values separated by a comma and to fill in multiple groups of extensions, as it follows: 1, 5-7 (eg the user is part of groups 1, 5, 6, 7)
The groups are defined based on internal organizational charts and are created in PBX server along with the first fill in of Call Group type value for a user
- Pickup Group: The option allows you to define pick-up groups for which the user can take calls; specify which is the pick-up group for which it can answer calls, filling in with a numerical value ranging between 0 and 63.
The field allows you to insert numeric values separated by a comma and to insert multiple groups of extensions, as it follows: 1, 5-7 (eg the user can answer Inbound Calls for groups 1, 5, 6, 7, of which he is NOT a member)
To retrieve a call from a Call group, the user must form the code corresponding to the Pickup call command displayed in section Home / Information / Dialing Info
- Remote ID: Allows user's ID to be inserted in order to match it with the external CRM;
The variable is used under special conditions (ex: for automatically submitting a ticket for each call, linked to the user that answered the call, directly from your CRM)
- Groups
internaluser = Check; for each new created user
permitlocal = Check; for each new created user
permiteverywhere check this option only when it is granted permission to the user in order to connect to PBX from any location, regardless of IP (the permission is granted only if Allow IP confirm! option is checked)
multiplechannels is used to permit to the agent to receive multiple calls, while in a conversation(by default max. 5 calls), externally or internally, from other agents.
Warning! If this option is utilized in order to see waiting calls from other clients, while in a conversation, then the user's queue in which the calls will be si in care vor intra apelurile, it needs the variable ringinuse=yes to be set up
- Email: Add the operator's email address in order to receive email notifications(E.g.: voice mails).
- Mailbox PIN: Insert PIN ID (numerical value) which will allow for voice mail listening; leave blank in order to deactivate voicemail option for this user
- Follow Me numbers: Insert one recording at a time on the line for: phone number, the number of seconds until number dial and the priority
(Ex.: 0700000000,30,1 for 30 seconds timeout with priority 1)
- Disable recording (monitor): controls the user's outbound call recording; outbound calls are recorded by default;
check if you DON'T want to record outbound calls for this specific user: Check
Variables:
- OUTGOING_TRUNK - optional, specify the type of trunk used for user's outbound calls; the variable can have one of the following values:
- SIP/default-trunk (use the main trunk)
- SIP/backup-trunk (use the backup trunk)
- SIP/other-trunk (use the provider's trunk)
- DEVNULL (outbound calls are not permitted for the user)
In order for this page to be used, the above mentioned values need to be previously defined: Access PBX/Outbound rules and complete/verify the name Trunk for the specific route. Take Trunk value defined for the specific route, in the OUTGOING_TRUNK field.
- DISABLE_SPY - this variable deactivates the monitoring on the user's dedicated channel;
default value no (user's calls are monitored);
select the value yes if you need to deactivate the monitoring;
- SPY_PERMISSION - the variable defines the monitoring method that the user will utilize:
- No permission
- Listen
- Whisper
- Barge
Each monitoring method that follows the other, includes the previous one. E.g.: Barge include Whisper AND Listen method
- OUTBOUND_DENY - fill in the field if the user is forbidden from using a certain route; to be filled in with a numerical ID type (e.g..: 123).
Steps to follow in order to forbid a certain route to this user: Access page PBX/Outbound rules and fill in and/copy the value from field Deny ID for the route that you want it to be forbidden. Fill in value Deny ID in the field OUTBOUND_DENY.
- OUTBOUND_PIN - insert the necessary user's PIN ID (numerical value) for external outbound calls (E.g.: 112)
- DIAL_ANSWER_PLAYBACK_FILE - select the audio file that will be played when the user answers a direct or forwarded call
- DIALOUT_PLAYBACK_FILE - select the audio file to be played when the caller will answer outbound calls initiated by the user
- VOICEMAIL_EXTRA_PARAMS - additional parameters for function Voice Mail; E.g.: s=disable instructions (vm-intro)
- FALLBACK_NUMBERS_OUTBOUND_NUMBER - see page Caller ID sending when forwarding call to mobile
Final settings
- Build and reload PBX after save: Check ; default and it is necessary before finishing adding the user
- Create a dedicated Queue for this user: use this option for Inbound Routes or in order for the transfers to be done to a dedicated queue of the user
- Click Create user
Add users to current queues
Available in other languages: RO